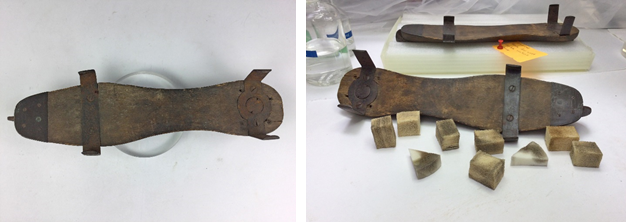
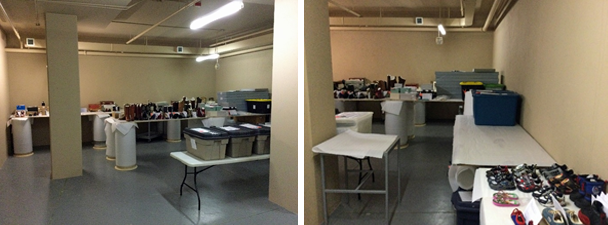
Step Into the Bata Shoe Museum

Navigation

  • Main Website
  • Exhibitions
  • Curatorial
  • Collections
  • Conservation
  • Interviews

I am retiring this summer and thought my last conservation treatment should connect to the first one. Thirty-four years ago I was hired to work on the women’s 18th century collection. It was a unique moment, as there was a BSM collection but no exhibition space. Myself and another conservator conserved the footwear that was most in need of intervention.

These shoes were purchased in 1982 from a dealer specializing in historic clothing and accessories. While the embroidered silk faille vamps were very pretty, it was obvious someone had fiddled significantly with the quarters on both shoes. Remnants of the original silk faille were glued to a figured silk satin. Random embroidery elements some original, a couple with a completely different aesthetic, were also glued to the replacement fabric.
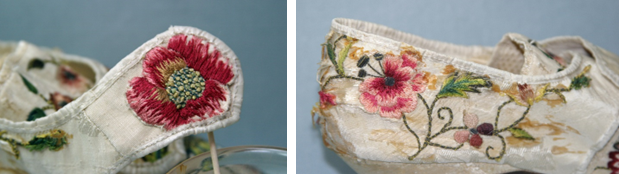
The flower on the left is a completely different style than the finely executed flower on the right.

The adhesive was disfiguring and damaging. It was an orangey-yellow colour, composed of brittle islands on the silk, as well as the leather lining to which it had been attached. The hard patches of adhesive were cutting through the desiccated fibres of the remaining faille. In several of areas the adhesive had dried out causing losses of embroidery, as witnessed by adhesive stains to which nothing was attached. The original silk ribbon binding was extant along the top edges of the tongue extensions but completely missing along the tops of the quarters. It had been replaced during the previous ‘restoration’.


After discussing these issues with the curator it was decided the figured silk satin should be replaced with a silk faille, the adhesive residue should be removed as much as possible and the replacement ribbon would be reused. Solvents were tested to determine which one would be best at removing the disfiguring adhesive. The topline ribbon was removed first, by clipping the stitches with a pair of curved blade scissors to prevent nicking the original fabric. Then the adhesive securing the original fabric to the replacement needed to be reduced in order to detach these components, and finally the quarters were removed.

Left: adhesive stains Right: removing adhesive residue from embroidery

The original faille was ivory but over time developed a very faint brown discolouration. The new faille, and hair silk for sewing, were dyed with tea to impart an aged appearance. The most complete replacement quarter was used as a template from which to cut the new quarters. It was lasted into the sole seam with a reversible adhesive and a spatula, taking into consideration that the weave of the new fabric needed to match the direction of the weave of the original remnants. The quarter was secured to the leather lining with tiny clips and rare earth magnets as anchors. The new fabric was sewn with hair silk and a fine beading needle that was passed through existing stitch holes along the topline.


Finding a replacement ribbon similar in weave and width to the 18th century ribbon is virtually impossible, at least I have yet to find a suitable source. The topline binding that came with the shoes was sewn back in place using the same technique as for the new quarters (hair silk, beading needle).


The treatment has stabilized the original fabric to prevent further damage, resulting in a shoe that looks more in keeping with the intention of the shoemaker.

  • 0 Comments

It’s important to have written and visual documentation on the condition of an artefact. This allows one to keep track of any changes to the materials, particularly for footwear composed of modern materials. Condition reports are written for incoming loans when other institutions and private collectors lend to upcoming exhibitions at the BSM. We also compose reports for outgoing loans to other museums that are borrowing to enhance the content of their future exhibitions. This allows the conservators at the destination to determine if any damage has occurred during shipment when comparing accompanying documentation.


The selected artefact is first photographed from a variety of angles (right foot first: sole, proper right side, vamp, proper left side, heel area and interior). Close-ups are taken of independent elements and to track potential changes in existing damage. Next, their documentation file is examined to see if there is any relevant information, such as a list of materials sourced from the manufacturer or previous conservation treatments.


The images are processed through Photoshop and printed off. The written report follows the same geography as the photography session. Additional information can include: if there are stains on internal supports or strong or unusual odours (and I’m not referring to stinky feet! which is a common question but a very rare occurrence). For instance, rubber can have a strong sulphur smell which is referred to as outgassing or off gassing and can cause internal supports to turn yellow over time.

Any physical abnormalities or unexpected historical additions are noted on the printed photographs. The condition report is attached to the annotated images and the documentation is added to the artefact file.

Currently we are examining plastics that have the potential to deteriorate. The shoes, pictured below, are covered with a polyurethane film that gives them the shiny white patent look. The vamp, which in parts is still shiny, has become quite dull and there are fine cracks in the film emanating from the holes created by the top stitching. These shoes were purchased by actor Catherine O’Hara as part of an outfit she created when reprising her character Lola Heatherton for a charity event. They were donated to the BSM in 2018.


Writing these condition reports is part of a much larger project. As mentioned in previous blogs, we are trying to determine which shoes will be moved to the new, retro fitted storage room. These baseline reports will establish current condition so that we have a reference with which to monitor any changes to component materials over time.

As we prepared for the new exhibition, Future Now, condition reports are updated or if they don’t already exist, baseline documents are created. This pair of sneakers was purchased specifically for the aforementioned exhibition. When they are new, fresh from the manufacturer, it’s the best time to write a report and photograph all the component materials in their original state. Details are taken of all the elements including the aglets at the ends of the laces.


Writing these reports is an ongoing project. It gives the conservator an opportunity to examine each shoe up close and in detail. Listing all the materials used in each structural component allows the observer to witness how they age over time as well as interact with each other.

Ada Hopkins

Conservator

  • 0 Comments

I have had the good fortune to be able to travel as a representative of the BSM to install artefacts or exhibitions in museums around the world. The first trip was to Taipei, Taiwan in June 2001. The Canadian Trade Office (CTO), based in Taipei, contacted Mrs. Bata to see if it would be possible to send a curated exhibition on the history of Western fashion footwear. The exhibition was part of a greater CTO initiative that included the Royal Winnipeg Ballet, the Royal Ontario Museum (ROM), as well as several Canadian authors.

The exhibition, Shoes in Fashion from 200 to 2000, was planned in Toronto without the aid of email when faxes were the default means of long distance communications. John Vollmer, Vollmer Cultural Consultants Inc., was the project manager/curator/catalogue author and Reich + Petch were the exhibit/casework designers. The planning had its challenges: different primary languages, completely different time zones and multiple parties trying to bring everything together in a timely fashion so that casework could be fabricated and catalogues printed in Taiwan.

Left:catalogue front cover © Bata Shoe Museum Right: back of catalogue, photo by Ron Wood

Once all the conservation and condition reports were completed, everything was packed into five crates and shipped via Air Canada to Chiang Kai-Shek International Airport, Taipei. The artefacts, which arrived a week before John and myself, were picked up by drivers from National Museum of History (NMH), the host institution.

We had one day to ourselves and took in as many cultural sites as possible: National Palace Museum, Shung Ye Museum (featuring the belongings of Taiwanese indigenous peoples) displaying artefacts on loan from the ROM, and the Hsing Tien Temple.

Left: National Palace Museum, Peellden, wikimedia.org/3672985 Right: Hsing Tien Temple, tripadivsor.ca

It took us four days to install the exhibition. We were assisted by a volunteer, who had completed a work placement at the BSM, and just happened to be visiting a friend in Taipei. Cora Ginsberg LLC, based in New York City, loaned a woman’s 18th century dress to augment the exhibition. The threads on some of the seams had disintegrated over time, and with the owner’s permission, John and I performed a round of guerilla textile conservation one evening using a repair kit provided by the hotel in which we were staying, along with supplies from a local fabric store.

The staff at the NMH were most accommodating, making repairs to broken casework as we experienced two earthquakes over a period of twelve hours. We accomplished a lot in a short period of time aided by many strong Taiwanese iced coffee to combat the jet lag which never seemed to go away! We took our lunch breaks in the museum’s cafeteria, next to the incredibly beautiful lotus pond behind the NMH.


The opening of the exhibition was celebrated with officials from the Taiwanese and Canadian governments as well as Mr. and Mrs. Bata. The day was concluded with a lovely dinner at the home of the head of the Canadian Office of Trade, overlooking the city.

Ada Hopkins

BSM Conservator

  • 0 Comments

Right off the bat, I want to apologize for the quality of the photographs. The room in which we are working has extremely limited lighting, which results in murky images! In February, we removed all the tables that had been used for temporary storage in the future permanent storage room. The first step in retrofitting the room involved examining the two exterior walls to determine if all the surrounding city construction had compromised their impermeability. There were several vertical cracks in both walls that needed to be excised for the engineer to examine.

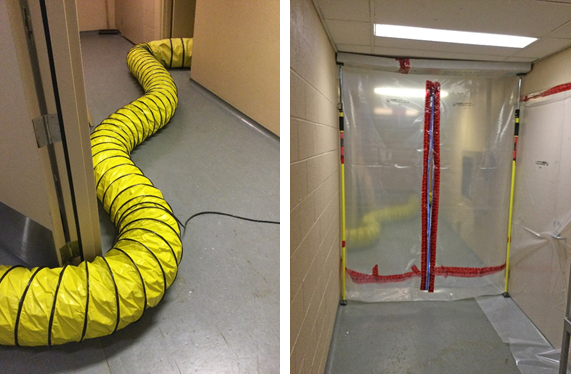
This stage created a lot of dust. To prevent the debris from moving through the HVAC system, filters were placed over all the intake vents, a sealed plastic curtain was hung in the hallway outside the room and a large hose to which a fan was attached pushed everything into an emergency stairwell.

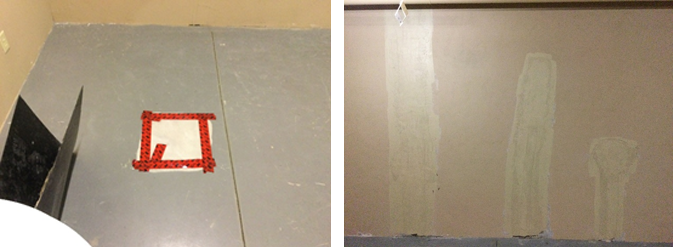
Once the engineer gave the ‘all clear’, the cracks were sealed, then filled to bring them even to the surfaces of the surrounding walls. After this treatment had dried, parging was applied to all the cracks as an extra cautionary step to prevent ingress of moisture. We also performed tests to see if moisture was rising up through the floor which is the pad the museum is built on. This was a very simple procedure: the floor sealant was ground off, a square of plastic placed over this area and all four sides of the patch taped to the cement floor. A hand held device called a concrete moisture metre was used to measure accumulated moisture which turned out to be insignificant. These two exploratory patches will remain on the floor as we work through the different stages of the retrofit. As we move into spring, a traditionally wet time of year, these patches will indicate if there is seasonal shift.

Next step is to bring in electricians to install extra wall outlets and, as referenced at the beginning of this blog, much needed additional lighting! I’ll keep you updated with the progress.

Ada Hopkins

BSM Conservator

  • 0 Comments

In 1995, just before the BSM opened to the public, the entire artefact collection was moved from its temporary location to its new permanent home. Previously, space was limited and the entire skate collection was stored in boxes. Now with new shelving and more space, the dilemma was how to safely store these artefacts so that they would be visible.

As one can imagine, skates do not naturally stand on their own! If left to their own devices, the skates would have to lie on their sides. This would expose the blades, creating potential for scratching their neighbours and making them challenging to handle. The storage solution needed to hold the skates in an upright position, support loose straps and shield the blades. The materials needed to be inert meaning they wouldn’t off gas, creating harmful vapours, which would make the metal corrode and cause degradation of the other materials of which the skates are composed. These could range from leather to modern plastics, depending on the age and specific function of the skate.

We settled on traditional and tested materials: polyethylene (PE) foam and polypropylene (PP) corrugated plastic sheet (Coroplast). We decided that in the upright position, in its support tray, the skates needed to be visible from the front and the back. This meant that you could see what the upper section of the skates look like without having to take them off the shelf, reducing over handling.

The storage containers are tailor made for each pair of skates. Each skate was placed in an acrylic ‘puck’ that held them in an upright position. The pair was placed, side by side, one facing forward, its mate facing backwards with enough space between so that they would not touch. The centre foam block was cut to these measurements plus the length of the skate blade, which is usually longer than the boot. Next two side blocks were cut to the same length but to a narrower width which is determined by the distance from the side of the blade to the widest part of the boot or footrest. A sheet of PP was cut to a dimension that would enclose these PE blocks, creating a base and covering the sides. The exposed surface of the PE blocks was covered with PE foam sheet to prevent scratching the metal blades or the sole of the leather boots at the point of contact. The overlapping corners of the PP container were skived down, then secured with hot melt glue. The foam blocks were placed inside the container, leaving a space between the outer blocks and the central block into which the blades would nestle. A variety of solutions is used to support the leather straps as they vary in condition and design.

Lastly, the artefact number is applied to the front of the container for two reasons: to tell you what the artefact is without having to remove it from the shelf and to match the storage tray back up to the skates should they become separated.

The end result is a collection of 111 skates that stand vertically on the shelves in the storage room. The support container keeps everything tidy and makes it easy to lift the artefacts without incurring damage.

Ada Hopkins, Conservator

  • 0 Comments

Last year the BSM received funding to support an online exhibition about the history of figure skating. This project was managed by the BSM's Collections Manager Suzanne Petersen. In the late spring of 2021 she went through all the skates in the BSM collection to determine which ones would best tell the story. Once her selections were finalized, I examined the skates to see which ones required treatment in preparation for photography.

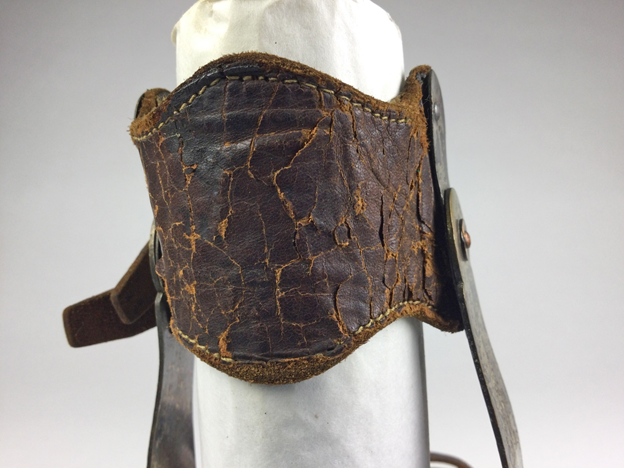
Out of 53 pairs of skates 14 pairs needed conservation. Once COVID restrictions were eased, I was able to work full time at the museum. I had two months to complete my portion of the project before handing everything over to the photography team. There was a group of eight pairs of skates, from the 19th century, composed of wooden footrests, into which steel blades were imbedded. These would have been attached to the skater’s boots with leather straps, a few of which were extant. Some of the straps were exhibiting red rot, a form of deterioration that undermines the stability of the leather, causing embrittlement of the fibres. Several leather straps were so degraded, they had broken into smaller sections causing delamination of the grain (the smooth surface of the leather).

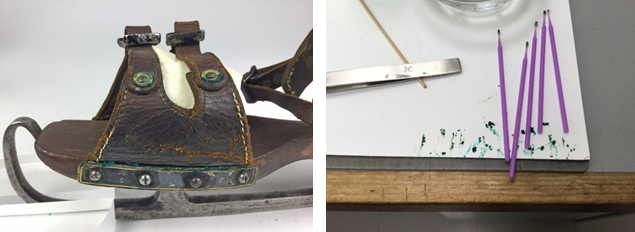
In several instances, leather straps had buckles and rivets used to keep everything in place. At some point, a previous owner had applied a leather dressing attempting to keep the leather supple. The oils from these applications interacted with the metal components creating a greasy, green crystalline residue called verdigris (you can see in the photo below how the paper support is stained yellow from the migrating oils). As the verdigris continued to accumulate it caused the leather to split and crack at the point of contact. The buildup of verdigris was removed with wooden picks, micro brushes and dental tools. Afterwards, soft bristle brushes were used to sweep the debris into a low suction vacuum.

Some of the wooden footrests had a buildup of dirt that had accumulated over their approximately 150-year lifetime. This was removed with latex free cosmetic sponges and dry cleaning sponges. The crumbs from this process were removed with a soft bristle brush and a low suction vacuum.

The BSM has shown individual pairs of skates in previous exhibitions but never together on such a specific topic. This project was a great opportunity to have a closer look at our collection of skates and treat them as a group. Boots & Blades: The Story of Canadian Figure Skating is now live and can be viewed here.

Ada Hopkins, BSM Conservator

  • 0 Comments

The artefact collection of the BSM continues to grow through donations and purchases. For the past ten years we having been struggling with diminishing storage space along with the need to store items made of modern materials in an appropriate environment. The original architectural plan for the museum included the design of a potential third storage room that could be retro fitted when the need arose.

In 2019 we reorganized all the items stored in the room we call ‘061’. There were paint cans, old display cases, etc. for which new homes were found. In 2020 we hired an outside conservation company to prepare a feasibility study for this new storage room. For the past year we have been using this room to house overflow on adhoc tabletops made from old show case bases as seen in the photos below.

February is the beginning of the first phase of preparing this room for its new purpose. The walls will be painted, additional overhead lighting will be added and we will test the floor to determine what kind of sealant will be used for waterproofing.

More updates with photos to come as we work through the many stages of this project.

Ada Hopkins, BSM Conservator

  • 0 Comments

This is the last blog in the series which reflects on the amazing skills of interns who chose the BSM lab for their placements. This particular intern was enrolled in the Master of Textile Conservation program at the University of Southampton, located in a port city on the south coast of England. They had worked as a shoe designer for Clarks, a British manufacturer and retailer founded in 1825, before enrolling in the conservation program. This previous experience made them uniquely qualified in understanding the physical structure of shoes, which was definitely an asset for a shoe conservator! In the summer of 2007 they traveled to Toronto for a two-month internship.

All conservation interns participate in the day-to-day activities of the conservation lab and are given a project to work on throughout their time at the museum. The shoes selected were made in the 1910s by Paris, France based company, Nicklich. These shoes were originally purchased by the BSM in 1986 from an Italian historic clothing dealer, as part of a collection of 22 pairs of shoes. Most were in good condition, however 3 pairs needed conservation, and this pair was in the worst condition.

The project required a strategic approach, first addressing the most fragile elements, then adding the final touches that would stabilize the shoes. The silk fibres of the satin upper had significant loss and the remaining strands were tangled; the topline ribbon binding was either missing or hanging loosely and the leather lining was distorted. The decorative buckle needed support as its weight, exacerbated by gravity, was creating stress on both vamps.

The first step was to remove accumulated surface dirt and dust with a low suction vacuum through a screen to prevent the fabric from being pulled into the nozzle. Particulate matter causes damage over time as these small particles become imbedded between the fibres of the fabric creating mechanical damage. Next, the leather lining and the satin fibres were passively humidified back into their original shape and alignment.

The picture on the left shows the satin upper/leather lining being humidified and reshaped. Passive humidification was accomplished using Gortex, dampened blotting paper and Mylar. The beige mat board sections were burnished to the shape of the distorted areas and held in place with rare earth magnets. The picture on the right shows how the twisted and tangled satin fibres were separated, gently humidified, then realigned. As work continued, these strands were held in place with entomology pins stuck into padded foam blocks.

The satin upper sections requiring support for the loose fibres were mapped with Mylar to create the templates for the plain weave silk fills. These fills were inserted between the upper and the lining then the loose fibres were couch stitched with dyed hair silk to the support. Silk crepeline ribbon was dyed to match the peacock blue of the original ribbon. This was used to encase the extant topline binding and was also stitched with the hair silk using an extremely fine beading needle through the existing stitch holes in the leather lining.

In the picture above you can see the stitching on the side of the shoe that holds the once loose satin fibres to the support fill underneath. The crepeline ribbon has been attached to the side of the topline closest to the viewer; the ribbon at the back of the photograph has yet to be stitched in place.

This was a time consuming but rewarding project. Before conservation, it was not possible to display these shoes. Now they are ready to be shown in future exhibitions.


Ada Hopkins, Conservator
  • 0 Comments

This blog continues to explore projects undertaken by interns at the BSM conservation lab. In 1982, the museum acquired one of several outfits, with matching shoes, made for Lana Turner when she starred in the 1955 MGM movie The Prodigal. The costume was composed of a heavily beaded silk bodice with silk pant-skirt attached. The bodice lining was torn and beads had either fallen off or were loosely dangling; the silk of the skirt was disintegrating; the shoes were worn but in stable condition. Because of the outfit’s poor condition, all the loose beads were collected from the shipping box, the outfit was padded with unbuffered acid free tissue and stored in an archival box until treatment could be performed.


In 2001, a conservation intern researched treatment options and wrote a detailed report with their recommendations but, unfortunately, there was not enough time in their placement to undertake the project. In the summer of 2005, a conservation student at New York University came to Toronto to work at the BSM as part of the practical component of their program. They reviewed the previous recommendations, sourced the materials, prepared a work plan and submitted a budget. The double layered silk chiffon skirt was conserved first as it was the most fragile element of the outfit. The creased and distorted hip coverings were humidified to bring the fabric back to its original shape. Silk crepeline, an extremely fine fabric similar to chiffon, was dyed with Earl Grey tea to achieve a good colour match; hair silk thread for sewing was dyed at the same time. The crepeline was then coated with an adhesive which was allowed to dry. A template of the skirt was used to cut the crepeline to size, then it was interleaved between the two existing layers. After positioning, the adhesive was solvent vapour activated. The areas of chiffon loss were filled with the dyed crepeline (without adhesive) and hand stitched in place with the hair silk.

Left: Positioning fragments of silk chiffon skirt over the adhesive impregnated backing fabric. Right: The slow process of rebuilding the hip coverings.

The bodice was lined with a similarly dyed thin plain weave silk, held in place with entomology pins, then stitched to the original silk with a small curved needle. Once the fabric components had been stabilized the beads were attached with the hair silk. The new lining provided much needed support for the very heavy beads. Loose beads were placed in areas of prominent loss. After treatment was completed, a support was carved from Ethafoam, lightly padded and covered with a cotton stretch knit fabric. This mount could also be used if the garment were to go on display in an exhibition.

Left: Securing the Chinese silk to the back of the bodice; note the curved needle used for stitching the support to the original. Right: New lining completed. From start to finish the entire project took two months. The end result is a significant and much needed stabilization, making it easier to understand what the garment was meant to look like when worn and preserving it for future examination and display.

Before and after photos. You can see where loose beads have been added to the bustier.
  • 0 Comments

Did you miss Ask a Conservator Day this year? Ask a Conservator Day is in remembrance of the flooding of Florence on November 4th, 1966, which damaged priceless cultural heritage. The social media campaign inspires conservators around the world to engage with each other to exchange knowledge and celebrate the growth of the field. Check out the answers to the questions you asked our conservator Ada below!

How do you think your role as a conservator will change as new innovations and technologies develop? (i.e. AR AND VR technology)

I haven’t had a chance to use either technology in artefact treatment at the BSM. However, I was watching a webinar presented by a UK conservator who used 3D printing to replace cleats that had totally disintegrated on a pair of football shoes. Textile conservators use digital printing on fabric to fill in large losses on historic clothing.

What does a conservator do? What projects are you working on?

I take care of the entire collection which includes many tasks. One major responsibility is how, where and under what conditions artefacts are stored. Preparing them for in-house exhibitions or for loans to other institutions. Monitoring the actual condition of the footwear with photographs and reports. Currently I’m getting a group of notable people’s shoes (2 of them are pictured below) ready for a loan to an exhibition at the Dutch Leather and Shoe Museum, Waalwijk, Netherlands.

Rihanna x Puma Fenty Creepers


Ginger Spice’s Buffalo platforms


How do you store your artefacts? Is temperature/humidity an issue?

We have several storage rooms which are climate controlled. The temperature and humidity are different in each room depending on the materials stored therein. The footwear sits on padded shelving, divided geographically, in chronological order, accompanied by their information cards. All the footwear is internally supported with archival material to help them hold their shapes. Special containers are made for items that require extra assistance. There are also cabinets with drawers housing 18th century shoe buckles, lithographs, shoemaker’s tools, guild certificates, fashion plates, etc.

The Chinese children’s boots are in special containers as they are not self-supporting.


The buckles are on carrying trays that prevent them from colliding into each other when the storage drawer is opened.


Does the BSM offer conservation internships/co-op opportunities?

In the past, the museum has hosted interns as part of their conservation curriculum. Currently, with COVID social distancing, the lab does not have the space to accommodate 2 people. Hopefully, next year this will change. Here’s a before/after of a previous intern’s project which is described in greater detail in a conservation blog post that dropped on October 24th.


You've mentioned in the past about the difficulties of preserving plastics, is there anything you're able to do as a conservator to slow down the deterioration process?

We are exploring this very issue! 20th century footwear and even more so, 21st century shoes have many plastic components which are challenging the traditional way museums house their collections. We are considering retro fitting an available room with a dedicated HVAC unit that will deliver cooler air and lower humidity levels.

The polyurethane (PU) top piece on the bottom of this mid 1970s heel is deteriorating and the plasticizer is mobilizing up into the leather; the PU coating on these Stella McCartney, Fall 2015, shoes is beginning to fog even though they are only 6 years old!


Is it better to keep my footwear in shoeboxes? How does light affect them?

Keeping your footwear in the original box is a good idea. That way you can protect them from getting jumbled up at the bottom of your closet. You can also pile the boxes on top of each other but not so high that they collapse under their weight. If you have lots of shoes, take a photo and attach it to the exterior so you know what’s inside. Let your shoes air out overnight after each wear, then put tissue paper or even socks inside to help them hold their shape. Absolutely, light damage is cumulative, so if you have a pair of shoes you love and want to display make sure they are not in a sunny window! See the side effects below.

Pair of Moroccan babouche that were originally green (ca. 1900); child’s very faded pink silk shoes (1830-45).


I recently purchased a pair of Victorian kid leather upper and regular leather base bottom portion boots. I noticed following handling them my hands were black which leads me to believe perhaps a prior owner used black shoe polish on them. What would you recommend? Try to remove polish or use something to buff out?


Without actually seeing them in person it’s hard to know what to say. It could be that the previous owner applied an overabundance of black polish or the surface of the leather could be powdering. You could try gently wiping the surface of the leather with a very soft, clean micro fibre cloth in an obscure test area on one of the boots (maybe the tongue or the heel).

I bought this pair of satin slippers and I think they are 1850s? Made in Paris. What is best way to keep them in shape? Stuff loosely with acid free tissue? Small padded shoe inserts? They are always kept in my glass curio display out of sunlight and rarely handled.


It’s great that you have them in a dust free cabinet. You could make your own padded inserts with a soft cotton knit (washed) and polyester batting. Be sure not to over stuff as it will distort their shape and in areas of stress, it will tear the satin. Acid free tissue paper is definitely another option. Manufactured shoe inserts can also cause damage; this is definitely not a case of one size fits all!

The leather and canvas upper (Czech Republic 1895) has shrunk around the wooden last which is now impossible to extricate even if the shoe were unlaced. The stress has caused the tear in the canvas along its topline.


How old is your oldest pair of shoes? Are you ever nervous about handling objects from thousands of years ago?

A conservator needs to study the object in question, taking into consideration the condition of the materials and the stability of all the component elements before picking it up. For instance, the oldest pair of shoes in the collection, the sandals pictured below, have pegs through which a thong would have passed. All those pegs sitting in the holes are not permanently affixed and if not picked up with that taken into consideration, would fall out, possibly splintering if they fell on the floor.

These are both from Egypt: the pair on the left is approximately 4500 years old, the pair on the right approximately 3500 years old.


How did you get into conservation? I struggle finding specific resources on how to get into the field.

I grew up with an interest in archaeology, art and art history, so conservation was a natural fit for me. This link will take you to a site that has a list of school programs available in Canada. Many countries have conservation programs if you wish to travel abroad.

Not shoes, but clothing related! I have inherited my great-Grandmother's Japanese silk robe (not sure if it's an actual Kimono but it is real silk), purchased on her year long honeymoon tour in the early 1920's. It needs cleaning, but how? And I would like to display it, but again how without damaging or staining the fibers. Any advice would be so very welcome!

There are many options: T-stands, padded dowels, large shadowboxes, 2-sided display cases, there are even specially designed kimono stands. As this is a precious 100-year old family heirloom, I recommend you consult a textile conservator to help you through this process, especially if you want it cleaned first.

  • 0 Comments

Due to COVID physical distancing we are unable to host conservation interns at this time. I thought I would continue looking into the way-back machine to share the work of previous interns. Most conservation programs require students to fulfill a placement with an established conservator mentor as part of their curriculum.

In 2006, a student attending the conservation program at Fleming College, Peterborough, Ontario, spent three months working on a variety of objects. One of the projects was to be used as a final research paper. The shoes selected for this purpose were purchased in 1984 from an antiques clothing dealer based in Switzerland. The condition of these silk satin shoes, on their arrival, was poor but the fact that they had the remains of a 1790 British maker’s label made them special. Plus, the fabulous yellow colour would be a unique additional to the BSM collection.

The float yarns, in the high stress areas, had disintegrated leaving the weft fibres hanging loose and the leather lining exposed. When weaving satin, the weft fibres run horizontally over three or four vertical warp fibres creating a smooth, shiny, reflective surface.

As you can see from the four photographs above, the parts of a shoe that experience the greatest wear are on the sides of the vamps, the ends of the toes and the heels. There is also considerable damage to the quarter, or side panel, of one of the shoes.

The first part of the project was to research how the shoes were made and the materials used. Next the intern reviewed past textile treatments to consider their options and consulted with the museum’s curator and the conservation mentor to determine the best course of action. Once this part of the process was finalized, adhesives were tested and suitable fabric replacements were dyed. Templates were made by securing polyethylene film over the area of loss with rare earth magnets, then tracing onto the film the perimeter of the loss. Fills were cut slightly larger than the loss to extend under the extant fabric and slipped between the satin upper and the leather lining. After adjustments, the fill was held in place with temporary stitches to prevent movement while work progressed. The loose weft yarns were passively humidified to align, then couch stitched to the new satin. In areas of significant loss, the striped pattern was mimicked on the fill with pencil crayons before stitching began.

The final steps were humidifying the creases in the vamps, reshaping the distorted counters (the heel area) and straightening the crumpled ruching (the pleated ribbon decoration) around the tops of the vamps. The end result is quite dramatic and far more photogenic!

  • 0 Comments
Older Posts Home

About Us

Discover the treasures of North America's charming and surprising shoe museum.

Follow Us

  • twitter
  • facebook
  • Instagram
  • youtube
  • LinkedIn
  • e-news

recent posts

instagram

COPYRIGHT © 2020 Bata Shoe Museum, Toronto, Canada. All rights reserved.
Powered by Blogger.

Template Created By : ThemeXpose . All Rights Reserved.

Back to top